5 Ways to Hang Bunting in Your Child's Bedroom
You love the idea of having bunting in your little one's room, but you feel intimidated at the thought of having to hang it? It can actually be a lot easier than you think.
I've put together some simple ideas of how to hang bunting in a child's bedroom or playroom. Most of these methods will leave no damage to your walls and can be done with just one person - so no need to wait for your other half to have a spare 5 minutes!
There are a number of different options, which would suit various lengths of bunting:
- Tie
- Tack
- Removable Tape
- Hooks
- Other Tips
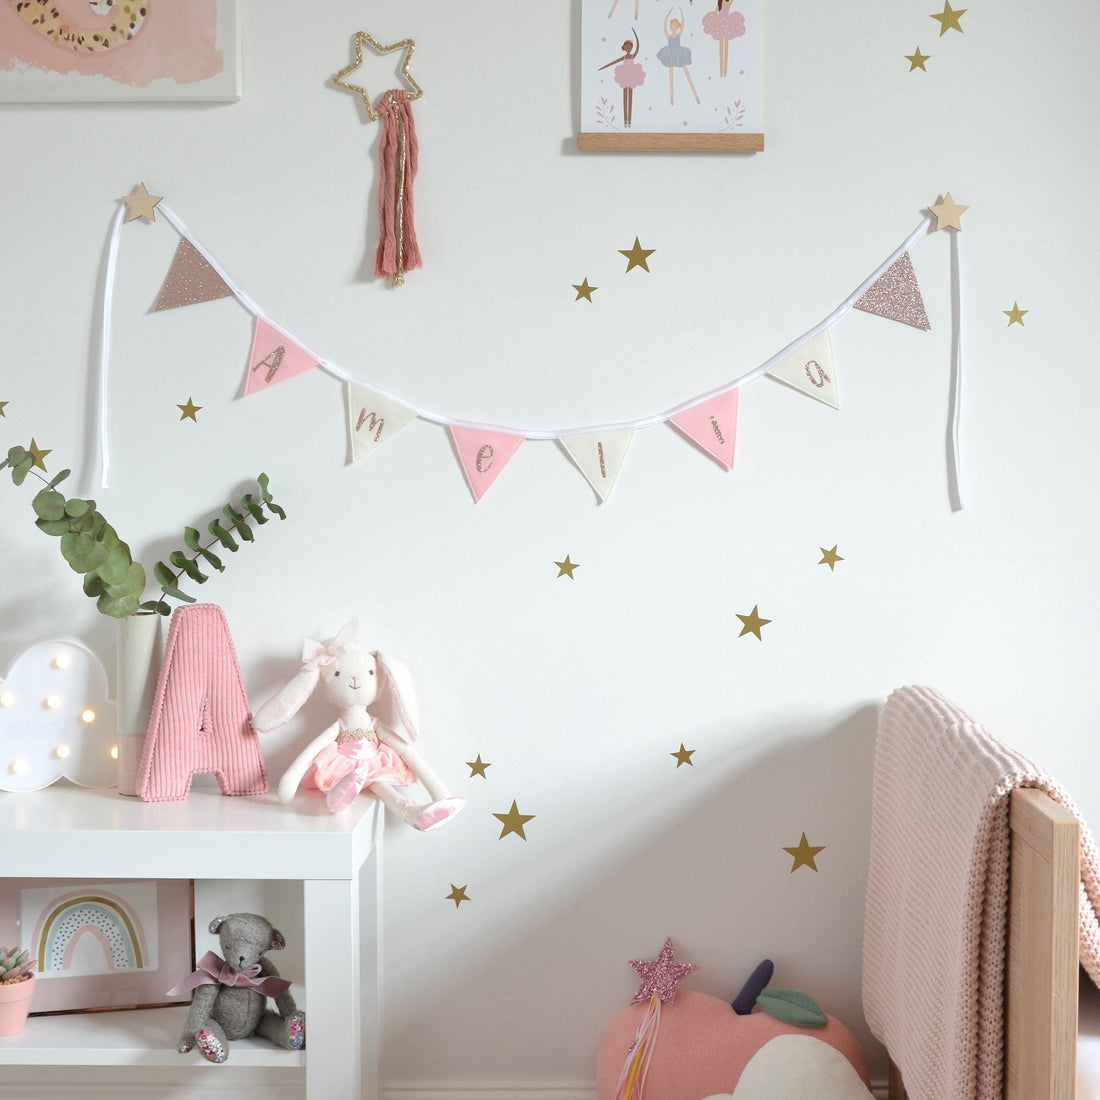
1. Tie
Tying to an existing structure is the simplest way to hang bunting, especially for a short length. With a double knot, it is also one of the most secure. Teepees are great for this. In this picture, I have moved the teepee into the perfect position for the length of bunting that I had. All our bunting is made to order, so if you require a specific length, please don't hesitate to get in touch.

Although these images both show teepees, our bunting would also look great on a bed frame or house bed. Just ensure that it is hung out of reach of children.

 If you're looking to create a dramatic look across the room, you could tie to a curtain rail at one end, then a bookcase at the other, for example.
2. Tack
The most secure method if you choose to hang your bunting across the ceiling, is to use a tack. This is probably the trickiest method and if you're not confident using a hammer, ask for someone else's help or choose a different method.

You can use a drawing pin, but personally I prefer these small tacks as they are less visible once in the wall. Hold your bunting into position first, to make sure it is in the correct place, then gently tap the tack though the binding.

Please be careful when tapping them in as you need to hold the tack with your fingers initially to secure it in place. It is also worth bearing in mind tacks will leave marks in the walls once removed, so not ideal if you're in rented property. However, if removed carefully the tacks leave only a very small hole and, if you're attaching in the corner of the ceiling, like these images, you'll barely notice the marks left behind.

3. Removable Tape
This is one of my personal favourites, as I change my bunting a lot! I use Scotch® Removable Tape. If you have painted walls in good condition this shouldn't leave any damage once removed. Personally, I have never had any issue and I use it a lot to swap and change bunting. It is widely available in most stockists of office supplies, as well as Amazon.

This method is ideal for short lengths, especially where the ends are exposed and you don't want drawing pins or tacks to be visible. A one metre length, like the below image will hang securely with around 5cm of tape just at the ends. I have successfully hung longer lengths of bunting across the room with just a few pieces of tape, but for extra security, I would advise to tie or tack bunting of 2 metres or more.

When you have positioned your bunting on the wall, apply a small piece of tape (around 5cm) at each end. I rub my finger firmly over the tape to ensure it is secure and this will also help the tape to appear invisible.
Believe it or not, the long piece of bunting in the image below is attached with removable tape. It is affixed at each end and then at three extra points in the middle to create this swag look. Although in most cases I have found that the removable table can hold long lengths, there is a risk that it may fall after a while due to the extra weight a long piece of bunting has, so please be extra cautious when hanging near young children's beds and cots.

If you look really closely at the image below you can just see the two pieces of tape that I have used either side of the bow. It's great how it appears almost invisible once applied firmly to the walls. Scroll down to see how I did the fancy bows.

4. Hooks
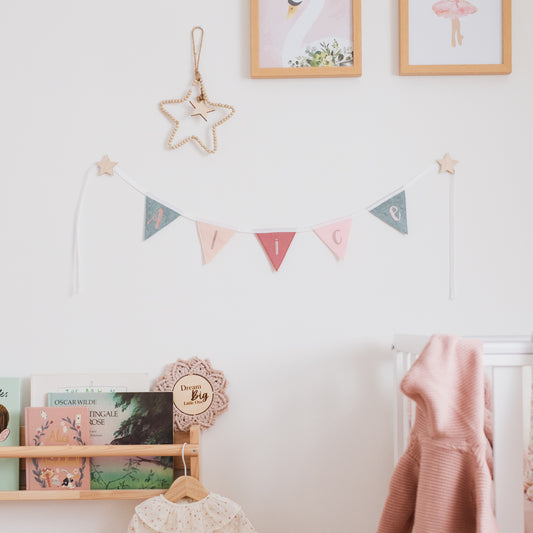
There are so many different hooks on the marketplace that you could use to hang your bunting from. You could buy a traditional hook and just tie a little loop at each end of your bunting. I love these decorative star hooks. They are simply stuck to the wall and then I have wrapped each end of the bunting around once. For a short length like one of our personalised banners, wrapping around once would be sufficient to support the weight of this bunting.


Other hooks also available - click here to discover more.

2 pack star hooks - shop here.
5. Other Tips
Bows
Do you remember the little bows in the earlier images? I like to tie a little bow at each end, particularly when taping or tacking my bunting, as I think it looks neater as a finishing touch. Watch the video here.
I usually tie the bow once the bunting is in position on the wall, but you could just as easily do it before you put it up. If you ask nicely I'll even tie the bows for you before I send your bunting out - just leave me a note at checkout.
Bear in mind that when you tie your bows they will fall in the same direction on both sides, so you will need to flip them to look like this (you notice me do this in the video). I also add a little bit of extra tape so that the bow stays upright on the wall.
Hanging across the ceiling
If you're looking to create real impact with two or more long lengths across the room like the below image, you may need to attach at a central point on the ceiling for added strength and to create that sweeping look. You can do this by adding a tack or hook into the ceiling, or alternatively you could use your light fitting in the way I did here.

I started by laying my bunting across the floor and then working out where the light fitting came to on the length of bunting. For example, you could count the number of flags to the central point if your light fitting is in the middle of the room. I then wrapped the bunting once around the light fitting, before attaching the bunting at each corner of the room. I then repeated this across the other length of the room. Once the bunting was secure you can neaten the flags wrapped around the light fitting and ensure that it is not touching any part of the light.

Conclusion
I hope you found these tips useful and it feels like a much easier task to hang bunting than you originally thought?
What method will you use? Perhaps you might use more than one method. For example, you could have one end tied to a bookcase, but at the other end you could tack into the corner of the room.
You'll find that some methods work better for you than others, depending on the length of your bunting. All our bunting is sold by the metre, but we will happily make a custom length, please contact us for more details.
We love to see how you hang your bunting in your little one's room, so don't forget to tag us on Instagram @styledtosparklekidshome.
Sarah x